World Wind Users Document
From World Wind Wiki
Sponsored by Vidahost webhosting and Thermal Degree web design.
The World Wind Users Document provides an overview of World Wind and points to additional wiki pages when more indepth information is available.
Contents |
Introduction
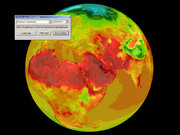
World Wind allows any user to zoom from outer space into any place on Earth. World Wind leverages satellite imagery and elevation data to allow users to experience Earth terrain in visually rich 3D, just as if they were really there. Virtually visit anyplace in the world. Look across the Andes, into the Grand Canyon, over the Alps or along the African Sahara.
For a more verbose explaination of World Wind and it's features please see World Wind.
Installation
Download Location
You can find information on where to download World Wind at NASA World Wind Download.
Installing World Wind
Run the installer that you downloaded and follow the prompts. World Wind will be installed on your computer.
Configuring World Wind
To configure World Wind you can use the keyboard commands ALT-Q and ALT-W.
You can also edit the configuration files directly. The configuration files are xml format and located in C:\Documents and Settings\username\Application Data\NASA\World Wind 1.3.
Startup / Using
Starting World Wind and General Controls
To start World Wind, click on the desktop icon that looks like this: Image:Wwshortcut.gif
This will launch the application and you will see a start screen. Note: some users have reported it locking up at this point. And some have got past this lockup by pressing Alt+F4. It stops the boot screen but not World Wind itself. Once World Wind is loaded, you will see the default Blue Marble view of the Earth. Now for the commands to use World Wind. You can use your mouse or keyboard to control World Wind's views.
I'm desperate: I installed it, and when I wanted to launched it it's gived me a message that it failed. What I'm going to do???
Mouse Commands
- Left Mouse Button = Hold this button down and move the mouse to rotate the earth to the right or left, top or bottom.
- Right Mouse Button = Hold and drag your mouse to tilt the earth to see the 3D views of an area that has SRTM data. You will not really notice this function till you zoom in closer to a point on the earth.
- Both Mouse Buttons = Zoom in and out of the Earth.
- Scroll Wheel = Use this to zoom in and out of the Earth.
Keyboard Commands
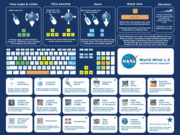
You can use keyboard commands to navigate around the World in World Wind. You can access a chart of common key commands from from the Help->Key Chart menu item.
Menus
The file menu choices are “File‿, “Edit‿, “View‿, “Tools‿ and “Help‿.
- File
- Save Screen Shot - Saves a screen shot of your current view of the world in World Wind
- Exit – Exits World Wind
- Edit
- Copy Coordinates - Copies a string similar to this, worldwind://goto/world=Earth&lat=64.21778&lon=24.72139&view=0.18390, to the clipboard. It can be used as a URL in an HTML document. Clicking the link will open World Wind and load the Lat/Lon and Altitude for that location.
- Paste Coordinates
- View (Has some of the same choices as the Toolbar)
- Show Toolbar – Turns the toolbar on and of
- Show Lat/Lon Lines – Turns the Lat/Long grid on or off
- Lat/Lon Line Color – Sets the color of the Lat/Lon lines
- Show Planet Axis – Turn the axis line (show the poles) of the earth on or off
- Show Cross Hairs – Targeting cross hairs that show the center of your view
- Show Position – Turn on the display of the Lat/Lon lines, Heading and Altitude
- Motion Momentum – When enabled, when you move the Earth with the mouse it will keep moving in that direction and speed
- Point Go-To – When enables, where you click on the globe, the view will rotate to that point so that it is the center of your view.
- Vertical Exaggeration -
- Always On Top -
- Fullscreen -
- Tools (Like View as the Toolbar choices)
- Layer Manager – Opens the Layers so that you can enable and disable layers in World Wind
- WMS Browser – Loads WMS
- SVS – Loads the Animated Earth
- Rapid Fire MODIS – Loads the MODIS interface
- Place Finder – Loads the World Wind search function
- Help
- Keychart - Loads the key chart image
- Website – Loads the World Wind website
- About – About World Wind
- Useful Sites – A listing of World Wind related sites
Toolbar
The toolbar is a quick link resource to the most commonly used World Wind layers. It can be turned on or off via the Tools > Show Toolbar menu choice. The toolbar looks like the one pictured below. It can differ if extra Add-Ons have been added to World Wind.
Navigating in World Wind
Accessing Data Views
There are several different types of data views to World Wind, you read about them in Introduction section of this documentation. The most commonly used icons are located on the toolbar of World Wind.
Blue Marble
Blue Marble is what loads by default in World Wind. It is 4km to 1km resolution images of Earth. Once you are zoomed in past the 1km resolution of the earth, the LandSat7 Layers then start to load. Blue Marble Imagery is shown down to an altitude of 780,000 meters.
Creating World Wind Add-Ons
World Wind is designed to allow you to create additional features that can be used in World Wind without having to write your own copy of the program.
Information about the different types of Add-ons and how to create them can be found at Add-ons.
Appendix
NASA OPEN SOURCE AGREEMENT VERSION 1.3
See NOSA for the full NASA Open Source Agreement


